Wednesday, November 18, 2009

Hidden Rooms

You may have noticed the man-sized holes in some of the previous post's pictures. We cut those holes in between the studs so that we could add some built-in shelving and storage to the bathroom (since we'd removed the closet). Imagine our surprise when we poked our flashlight into the new holes and discovered...more storage!


We should have realized that the bathroom and its adjacent bedroom would hide another kneewall storage area, but since it's the only kneewall section in the house without a door, we never really thought about its existence. We definitely plan on finishing this space off and using it for more storage once we start work on the 2nd bedroom upstairs, but in the meantime, we settled for installing about 100 layers of insulation in it.

News Flash: Backer Board Crushes Sara


Yes, that's me under there, looking like a paint-splattered Wicked Witch of the East, crushed by (what else?) a house. I was trying to steer the supply lines and drain pipe through the backerboard cutouts when Jasun couldn't contain himself any longer and went to go grab the camera. I was laughing too hard to yell at him properly.

We Have a Floor!


Like any home project, the concepts behind installing subfloor and backerboard are easy:

1) Draw templates for the plumbing drain and supply lines. (Hint: Try not to screw your subfloor into any PVC or copper piping. This will cause leakage problems and the ceiling below will yell at you.)

2) Layout floor so that the long section of each panel is perpendicular to the joists.

3) The ends of all panels must be centered on a joist.

4) Stagger the placement of boards to avoid four corners meeting (also avoid 3 corners meeting, if possible).

5) Create cutouts in the flooring for the plumbing drain and supply lines.

6) Using cement-coated screws, secure the subfloor to the joists. See Hint 1.

7) Repeat steps 2-5 for the concrete backerboard, laying long edge of backerboard perpendicular to long edge of subfloor.

8) Mix thinset (NOT mastic) to required consistency (creamy like peanut butter), and apply to subfloor with float, working in sections.

9) Place backerboard over thinset, tamp down gently, and screw to subfloor at 6-10 inch intervals. Again, see Hint 1.

And like any home project, the details (lugging subfloor and backerboard pieces up and down a tiny winding staircase 100 times to make cuts on the workhorses out front) are what make the work difficult. Still, Jasun and I had a pretty good time installing the bathroom floor. I mean, at the time, it felt like the first tangible progress that we'd made in weeks!

Here are some pictures showing the installed subfloor. In retrospect it's hilarious to me that we thought this looked PHENOMENAL. We were so excited to have an actual floor in the bathroom again. No wonder our friends looked at us like we were crazy when we showed them the bathroom and expected them to ooh and ah over the floor.


Friday, November 13, 2009

A New Plan for an Old Layout

1970's linoleum removed - Check
Closet from previous 1970-ish remodel demolished - Check
Horrific white and gold-speckled vanity trashed - Check
Cheap gold light fixtures disconnected and recycled - Check
Almost pristine clawfoot tub moved to upstairs - Check.
Built-in bathtub removed & recycled - Check

And so it went - the list that formed a constant refrain in my head through most of March and April, 2009. Up until the bathtub switch, Jasun and I had intentionally decided not to talk about the bathroom layout, since neither of us knew how much useable space we truly had to work with until the closet, wall bump-outs, and built-in tub had been removed. Once all of those items were completed, however, we immediately saw that we had a problem: slanted ceilings. To attach a shower to a clawfoot tub, you need a ceiling with enough clearance to accomodate the shower riser, like this:

Our bathroom walls, however, only have 4-4.5 ft of vertical height before they begin to slant along the roofline. Now, we could have fashioned something similar to this system, which would have probably looked awkward, or we could have placed the clawfoot tub along the windows of the bathroom, which would have meant that the exposed piping would have been near the toilet, which would have looked even more awkward. In the end, we decided that we could squeeze in a custom-poured separate shower AND the clawfoot tub if we were creative with the space - and if we realized that we would never be able to magically transform a 6x8 foot room into the palatial master suite that you always see in magazines. What type of old houses do those people live in, anyway? Old houses with major additions on the back, I'm guessing!

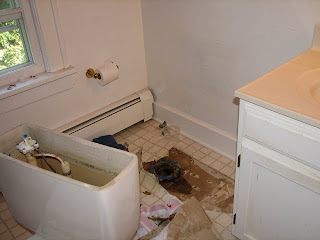
This new layout meant that we would have to move some plumbing, which meant tearing up the floor of the bathroom:

I have to say, the bathroom (and the entire upstairs) smelled A LOT better after we got rid of that subfloor!

We had a few interesting Restoration Archaeology moments after removing the subfloor. First, we discovered that the downstairs bathroom, which sits right underneath the upstairs bathroom, doesn't just have one wall covered in wire mesh concrete, but is completely encased in concrete along 3 of its walls. We could actually see the inner concrete wall structures through some of the upstairs bathroom joists. If there's ever a tornado, I'm confident that we really will be completely safe in the downstairs bathtub. Second, Jasun and I had a blast pawing through some of the "trash" left behind by previous work crews/owners who had remodeled the bathroom before us. Along with the usual detritus that you might find on a work site (nails, bits of insulation, a few cigarettes), we discovered a ton of what looked like hand-shredded newspaper stuffed around the toilet stack pipe. After sifting through the paper, we discovered a few things:

1) The newspapers were Centre Daily Times, Wall Street Journal, and Charleroi issues from the 1930s. (We know that the original owners were from the Charleroi, PA area.)

2) The shredded pages from at least two medical journals were included with the jumble of newspaper pieces. (Remember that one of the original owners of our house was a doctor, Charles Dietterich?)

Nevermind the fact that we'd found all of this paper stuffed around a toilet stack; I was excited! I put on some gloves and started examining each piece in the rubble to see if I could put together anymore dates or articles. Most of the paper bits were too small to read more than a scattered word or disjointed phrase, but the few pieces that were large enough to meld together formed an obituary of the Rev. James Eugene Dietterich, Charles Dietterich's father. The first owners of our house were James Eugene and Margaret Dietterich, Charles' parents, who moved to State College after James became ill in the early 30's. According to differing obituaries, both James and Margaret died in the house (at separate times, of natural caueses). In fact, Margaret passed away on October 31st, Halloween! (I am definitely going to enjoy scaring the stuffings out of my children someday with that story.)

Maybe because Jas and I were mildly uncomfortable with the idea of two people having died in the house that we were living in, Margaret Dietterich's "ghost" became a source of humor for us early in the renovation process. Whenever the old house creaked or we felt a noticeable draft that would open and close doors, we would greet "Margaret". I knew that my imagination had gotten the better of me when, in early February of last year, the door to our bedroom opened of its own accord and Jasun said cheerily, "Come in, Margaret!" at which point I slapped him on the arm and chastised, "Don't INVITE her in!" As Jasun dissolved into laughter, I realized that I was being an idiot...and maybe we should cut out the Margaret references for a little while.

Anyway, back to the shredded paper: how did it get there? The most obvious answer is that a subsequent homeowner found some old medical journals and newspapers lying in the knee-wall storage closet near the bathroom and tore them up to use as quick insulation around the toilet stack. I find it interesting that the only shreddings large enough to be decipherable were connected to James Dietterich's obituary, but I don't think that I can draw any meaningful conclusions from it.

Tuesday, November 10, 2009

Bathtub Switch

The original Sears plans for our house describe what is now the master bathroom as a "play room," probably because it didn't originally have a closet, and therefore couldn't be classified as a bedroom. However, the Sears Catalogue goes on to say that the owner had the option of turning the room into a bathroom, and due to the existence of our faux subway tile (which also appears in the kitchen and is, I think, original to the house), I'm fairly certain that the Dietterichs took advantage of this option. If we then assume (again, from the existence of the faux subway tile on all four bathroom walls) that the room had neither a closet nor hidden plumbing, then it's a safe assumption that the master bathroom originally boasted a clawfoot tub. Although built-in bathtubs were definitely available (and in vogue) by the early 30's, the excellent condition of the plaster subway tile along the walls (ie. no water damage) and some conversations with other Sears homeowners in the neighborhood confirmed my suspicion since a few of them had removed clawfoot bathtubs from their upper bathrooms.

Fortunately for us, we have friends who are restoring an amazing Victorian mansion in Sellersville and offered to give us their old clawfoot tub free of charge. So now we had a very weighty task ahead of us: get one massive, built-in cast iron tub down a narrown flight of stairs and get another massive, clawfoot cast iron tub up the same narrow stairway. We called every big, strong man we knew.

We bribed them with food.
We bribed them with beer.

They came.
They saw.
They kicked butt moving those tubs:


Restoration Archaeology

I always say that restoration is the opposite of remodeling. When you remodel a room, it takes 1 day to rip the existing structure apart and the rest of the time to build it back up. When you restore a room, you spend 80% of the time meticulously removing decades of previous "upgrades" and 20% of the time actually building the room back to a useable state. This time discrepancy is one of the reasons restoring anything can be so frustrating. It seems like you're never at the point where you're actually creating anything. Still, restoration can be fun for other reasons - like the thrill of Restoration Archaeology.

What is Restoration Archaeology, you ask? Why, it's the act of meticulously peeling away layers of previous, ill-advised remodels to reveal the original house underneath, of course. For example, our master bathroom had a bathtub/shower and a closet recessed into the eaves of the roof:


The first thing you should notice about this picture, fellow Restoration Archaeologists, is the doorknob. It's not original to the house. You can't see it from the picture, but the hinges also weren't original ball-tip hinges. Hmmm...were the built-in tub and closet added at a later date, perhaps? Curious, I crawled into the closet one day, removed the plumbing access panel to the bathtub, and shown a flashlight into the surrounding space. Immediately, I could see that the walls surrounding the tub were "fake" walls that had been built out, away from the true wall connecting the bathroom to the adjacent bedroom. Along those walls, amazingly, were perfectly preserved "faux" subway tiles, exactly matching the tiles that extended around the visible part of the room. According to Jane Powell's book, Bungalow Bathrooms, faux subway tiles were quite popular in the 20's and 30's. People would score their plaster to look like subway tile and then paint the plaster in a gloss finish to mimic the real thing. It was a way to get the tile "look" without the expense!

Of course, we had to keep this nod to history in our "new" bathroom, so Jasun took extreme pains to restore the plaster tile. The fake wall built-outs and the plastic 70's wall-board, on the other hand, had to go:

Wow! Look at that blue! Original 1930s? 40s? 50s? It was an even more vibrant color up close! Incidentally, Jasun's heart sank when we he saw all of the damage that the wall-board glue had left on the plaster. He spent endless hours sanding glue residue, plastering, sanding, replastering, and sanding again until he was happy with the finished product - smooth, beautiful walls.

Hell Starts Here

When we first removed the toilet in the master bathroom to reveal a sodden stack surrounded by rotting floorboards, Jasun relayed a story that only men in this town would know:

Apparently, in the men's bathroom at Zeno's, there is a hole in the floor near one of the urinals that has been there ever since Jas was in college. (I won't say how long ago that was.) Next to the hole to nowhere, someone scribbled "Hell Starts Here," and the etching has remained despite numerous white-washings of all of the other grafitti.

It was meant as a funny joke. We laughed about it as we donned masks and gloves, as we began to rip away linoleum that probably had asbestos on it and revealed more of the subfloor. Oh, the irony


As I look back on all of the photos that we've taken, detailing our journey through this bathroom remodel, I can't believe that we're almost finished, that it took as long as it did, that everything looks so different. Did we once really have a bathroom that putrid pink color? Did we really put up with showering and bathing in a tub with plastic walls from 1972 that never seemed to come clean no matter how hard we scrubbed? Just looking at some of these pictures is the equivalent of watching a horror movie for me: "Hell Starts Here: Remodeling a 1930 Bathroom."